Hexo 安装日志
在 Ubuntu server 20.04 LTS 上安装 Hexo
¶建议先用su切换为管理员账户,或用root账户登录
这样子后续需要sudo的地方就不需要在打了,而且全程su能避免不必要的错误。
¶Hexo简介
Hexo 是一个快速、简洁且高效的框架。Hexo 使用 Markdown(或其他渲染引擎)解析文章,在几秒内,即可利用靓丽的主题生成静态网页。
¶Hexo安装
¶安装前提一:安装git
sudo apt-get install git-core¶安装前提二:安装Nodejs
# Using Ubuntu
curl -fsSL https://deb.nodesource.com/setup_lts.x | sudo -E bash -
sudo apt-get install -y nodejs
验证安装结果:
node -v
npm -v
可安装cnpm替代npm,从而使用国内的淘宝源(可选)
npm install -g cnpm --registry=https://registry.npm.taobao.org此安装方式,npm和cnpm不冲突,都可使用。
¶正式安装Hexo
sudo npm install -g hexo-cli 可使用cnpm代替安装sudo cnpm install -g hexo-cli 。
验证安装结果:
hexo -v¶新建一个Blog
¶创建Blog存放目录并进行初始化
mkdir blog # 新建一个目录,来保存blog文件,出问题删除该文件夹即可进行重建
cd blog
sudo hexo init # 初始化¶启动并预览
sudo hexo s在浏览器输入ip:4000即可查看
ip为你搭建Hexo的系统的ip地址,以我为例,即我的Ubuntu系统ip
¶新建一篇文章
sudo hexo n "新的文章"会在你建立的your_blog_directory路径下的/source/_posts/里创建新的文章.md,便可用Markdown写文章了
以我为例新的文章.md在目录blog/source/_posts/下
¶添加文章后清除缓存文件并重新生成静态文件
sudo hexo clean && sudo hexo gHexo配置
在 Hexo 中有两份主要的配置文件,其名称都是 _config.yml。 其中,一份位于站点根目录下,主要包含 Hexo 本身的站点配置;另一份位于主题目录下,这份配置由主题作者提供,主要用于配置主题相关的选项。
/hexo/_config.yml
/hexo/themes/next/_config.yml¶Hexo基础配置
¶作者、语言、时区等设置
# Site
title: 悬崖不勒马的小站
subtitle: ''
description: ''
keywords:
author: 悬崖不勒马
language: zh-CN
timezone: Asia/Shanghai

# URL
## Set your site url here. For example, if you use GitHub Page, set url as 'https://username.github.io/project'
url: https://xuanyabulema.github.io¶修改并配置Hexo主题——NexT主题
¶替换主题
以我安装NexT主题为例
¶版本
在 【必读】更新说明及常见问题 中有相关说明,NexT 一共有三个不同的仓库:
| 版本 | 年份 | 仓库 |
|---|---|---|
| v5.1.4 或更低 | 2014 ~ 2017 | https://github.com/iissnan/hexo-theme-next |
| v6.0.0 ~ v7.8.0 | 2018 ~ 2019 | https://github.com/theme-next/hexo-theme-next |
| v8.0.0 或更高 | 2020 | https://github.com/next-theme/hexo-theme-next |
旧的仓库基本上已经不再更新,因此推荐选择最新的 https://github.com/next-theme/hexo-theme-next仓库的 NexT 主题
cd blog
git clone https://github.com/theme-next/hexo-theme-next themes/next # next 7
git clone https://github.com/next-theme/hexo-theme-next themes/next # next 8更改主题,修改站点配置文件_config.yml,找到如下代码:
## Themes: https://hexo.io/themes/
theme: landscape将theme: landscape改为
theme: next¶设置头像
https://theme-next.iissnan.com/getting-started.html#avatar-setting
编辑 主题配置文件
修改字段 avatar, 值设置成头像的链接地址。其中,头像的链接地址可以是:
| 地址 | 值 |
|---|---|
| 完整的互联网 URI | http://example.com/avatar.png |
| 站点内的地址 | 将头像放置主题目录下的 source/uploads/ (新建 uploads 目录若不存在) 配置为:avatar: /uploads/avatar.png 或者 放置在 source/images/ 目录下 配置为:avatar: /images/avatar.png |
¶设置网站的图标Favicon
把图标放在/themes/next/source/images里,并且修改主题配置文件_config.yml:
favicon:
  small: /images/favicon_16x16.ico
  medium: /images/favicon_32x32.ico
  #apple_touch_icon: /images/apple-touch-icon-next.png
  #safari_pinned_tab: /images/logo.svg
  #android_manifest: /images/manifest.json
#ms_browserconfig: /images/browserconfig.xml¶添加分类界面
¶新建分类界面
hexo new page categories成功后会提示:
INFO Created: ~/blog/source/categories/index.md这样就创建了分类页面,但是这个时候主题还不会识别这个页面为分类页,需要编辑这个新建的页面,让主题识别这个页面,并自动为这个页面显示分类。
修改index.md为:
---
title: 文章分类
date: 2021-01-25 22:37:25
type: "categories"
---¶修改主题配置文件
在themes/next/_config.yml,找到如下代码:
menu:
  home: / || home
  #about: /about/ || user
  #tags: /tags/ || tags
  #categories: /categories/ || th
  archives: /archives/ || archive
  #schedule: /schedule/ || calendar
  #sitemap: /sitemap.xml || sitemap
  #commonweal: /404/ || heartbeat
把 categories 前面的 # 删除,因为默认页面是没有标签界面与分类界面,所以需要我们手动创建添加。
¶给文章添加分类信息
---
title: Hexo安装日志
date: 2021-11-26 07:39:29
categories:
- 折腾
- Hexo
tags: [Hexo,ubuntu]
---
如上设置二级分类则该篇文章为 折腾分类下的 Hexo分类下。
¶添加标签界面
同分类界面,类似的
¶新建标签界面
hexo new page tags修改index.md为:
---
title: 标签
date: 2021-01-25 22:37:25
type: "tags"
---¶修改主题配置文件
在themes/next/_config.yml,找到如下代码:
menu:
  home: / || home
  #about: /about/ || user
  #tags: /tags/ || tags
  #categories: /categories/ || th
  archives: /archives/ || archive
  #schedule: /schedule/ || calendar
  #sitemap: /sitemap.xml || sitemap
  #commonweal: /404/ || heartbeat
把 tags 前面的 # 删除
¶给文章添加标签信息
---
title: Hexo安装日志
date: 2021-11-26 07:39:29
categories:
- 折腾
- Hexo
tags: [Hexo,ubuntu]
---
则标签为"Hexo"和"ubuntu"
¶添加关于页面
hexo new page "about"在themes/next/_config.yml,找到如下代码:
menu:
  home: / || home
  #about: /about/ || user
  #tags: /tags/ || tags
  #categories: /categories/ || th
  archives: /archives/ || archive
  #schedule: /schedule/ || calendar
  #sitemap: /sitemap.xml || sitemap
  #commonweal: /404/ || heartbeat
把about前面的 # 删除
编辑source/about/目录中的index.md文件即可
¶配置Markdown与Typora搭配添加图片
安装插件:
sudo npm install hexo-renderer-marked修改_config.yaml站点配置文件:
post_asset_folder: true
marked:
  prependRoot: true
postAsset: true当该配置被应用后,使用hexo new命令创建新文章时,会生成相同名字的文件夹,也就是文章资源文件夹。
修改Typora配置
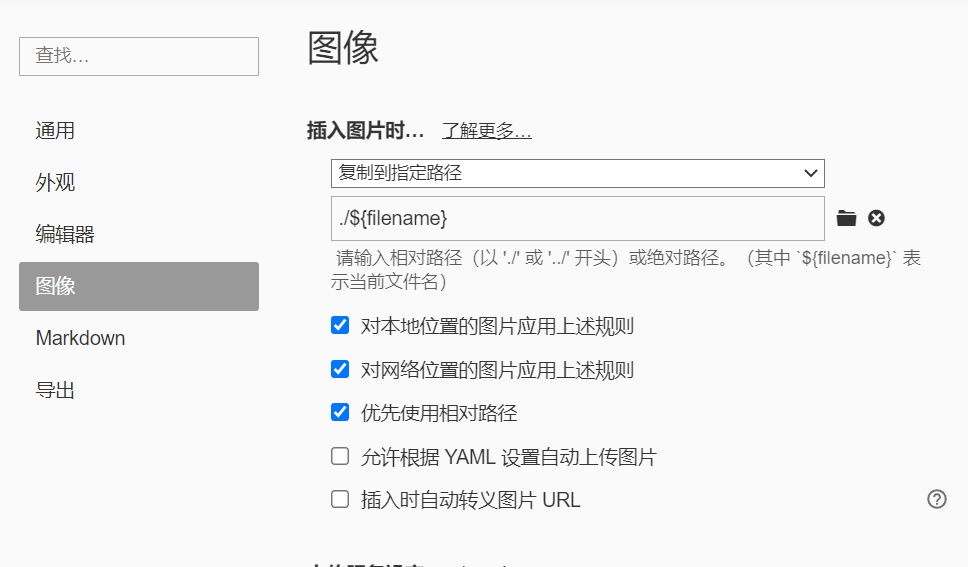
如复制网络路径的图片https://...../image.jpg粘贴到Typora中叫文章名的文章后,图片会自动变为。
但我们知道部署后,文件路径是不同的,所以当我们插入完所有的图片后,我们还需要删除每个图片路径中的文件名/。不慌,也很简单。
在Typora编辑器中,使用<C-f>快捷键,将所有的文章名/替换为空即可删除。

¶浏览页面显示当前浏览进度
打开 themes/next/_config.yml,搜索关键字 scrollpercent,把 false 改为 true。
¶Local Search本地搜索
安装插件hexo-generator-searchdb
npm install hexo-generator-searchdb --save修改_config.yml站点配置文件,新增以下内容到任意位置:
search:
path: search.xml
field: post
format: html
limit: 10000
编辑 themes/next/_config.yml,启用本地搜索功能:
# Local search
local_search:
enable: true¶增加文章字数统计及阅读时常功能
安装插件hexo-symbols-count-time,执行以下命令:
npm install hexo-symbols-count-time修改_config.yml站点配置文件
symbols_count_time:
  symbols: true
  time: true
  total_symbols: true
  total_time: true
  exclude_codeblock: false
  awl: 4
  wpm: 275
  suffix: "mins."
字数统计严重不对,感觉统计的是字符数
¶添加阅读全文
将下述内容添加到项添加的范围即可
<!-- more -->¶加上妹子
https://blog.csdn.net/as480133937/article/details/100138838#t26
npm install -save hexo-helper-live2d然后在_config.yml中添加参数
live2d:
  enable: true
  scriptFrom: local
  pluginRootPath: live2dw/
  pluginJsPath: lib/
  pluginModelPath: assets/
  tagMode: false
  log: false
  model:
    use: live2d-widget-model-<你喜欢的模型名字>
  display:
    position: right
    width: 150
    height: 300
  mobile:
show: true在站点目录下建文件夹live2d_models,
再在live2d_models下建文件夹<你喜欢的模型名字>,
再在<你喜欢的模型名字>下建json文件:<你喜欢的模型名字>.model.json
最后安装
npm install --save live2d-widget-model-<你喜欢的模型名字>¶设置文章模板
模板文件信息位于./scaffold 文件夹下的 post.md 和 draft.md
对应就是 hexo new [layout] <title> 中的 layout , 默认为 post, 草稿为 draft, 如果标题包含空格的话,请使用引号括起来。
---
title: {{ title }}
date: {{ date }}
tags:
categories:
---

点击阅读前文前, 首页能看到的文章的简短描述

<!-- more -->
¶添加备案号
修改主题配置文件_config.yml
参考修改如下
# Beian ICP and gongan information for Chinese users. See: https://beian.miit.gov.cn, http://www.beian.gov.cn
  beian:
    enable: true
    icp: 浙ICP备2022000215号-1
    # The digit in the num of gongan beian.
    gongan_id:
    # The full num of gongan beian.
    gongan_num:
    # The icon for gongan beian. See: http://www.beian.gov.cn/portal/download
gongan_icon_url: /images/beian_logo.png¶让Google搜索到GitHub上的个人博客
安装扩展
npm install hexo-generator-sitemap --save配置站点_config.yml文件
# 自动生成sitemap
sitemap:
  path: sitemap.xml
部署Hexo到GitHub
¶生成ssh key以配置和使用GitHub
sudo ssh-keygen -t rsa -C "XXXX@email.com"以我的为例
sudo ssh-keygen -t rsa -C "xuanyabulema@qq.com"cat .ssh/id_rsa.qub然后将cat获取到的结果存至GitHub
验证是否连接成功
ssh -T git@github.com
¶安装插件
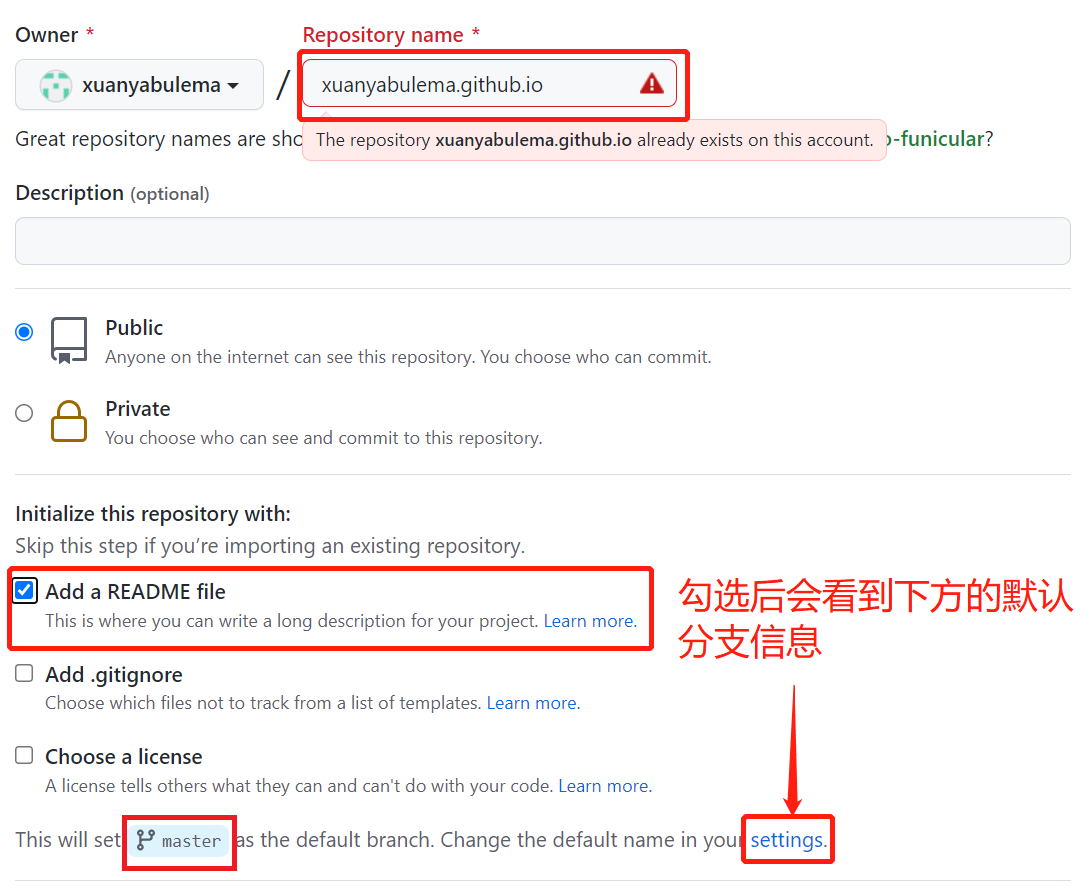
sudo npm install --save hexo-deployer-git¶新建一个GitHub仓库来保存网页
格式为<你的 GitHub 用户名>.github.io
¶修改_config.yml
修改末尾为
deploy:
  type: git
  repo: 创建的仓库地址
  branch: 创建的仓库地址的默认分支
以我的为例子
deploy:
  type: git
  repo: git@github.com:xuanyabulema/xuanyabulema.github.io.git
branch: master¶推送到GitHub
sudo hexo clean && sudo hexo d浏览器输入<你的 GitHub 用户名>.github.io,即可访问
欢迎访问我的xuanyabulema.github.io
¶一个坑
¶err: Error: Spawn failed
如果用非root用户ssh-keygen -t rsa -C "XXXX@email.com",创建将会可以连接的上GitHub,但是在hexo d部署到GitHub时总是失败。
Please make sure you have the correct access rights
and the repository exists.
FATAL {
  err: Error: Spawn failed
      at ChildProcess.<anonymous> (/home/zekuan/blog/node_modules/hexo-util/lib/spawn.js:51:21)
      at ChildProcess.emit (node:events:390:28)
      at Process.ChildProcess._handle.onexit (node:internal/child_process:290:12) {
    code: 128
  }
} Something's wrong. Maybe you can find the solution here: %s https://hexo.io/docs/troubleshooting.html¶解决方式
删除当前已有的.ssh/下的文件
使用
sudo ssh-keygen -t rsa -C "XXXX@email.com"然后将/root/.ssh/id_rsa.pub下的秘钥添加至GitHub,并进行重新推送sudo hexo clean && sudo hexo d